Supplies:
- Canvas [I used 11x14 but you can use any size]
- Fabric [2/3 yard, less or more depending on the canvas size]
- Batting
- Ribbon [I used one spool of ribbon]
- Brackets
- Scissors
- Thumb Tacks or Staple Gun
- Ruler
Overlaying fabric with batting over a piece of canvas is an easy way to achieve the store-bought memory board look. It is also a cinch to hang onto the wall--no wall mounts or fancy picture-frame hardware needed. I chose an 11 x 14 canvas, but you can go larger or smaller.
I recommend a layer of batting between the overlaying fabric and the canvas to create a nicer look, but is not absolutely necessary.
1. Lay canvas on top of fabric and batting. Cut the fabric and batting to two inches wider on each side of the canvas [my piece measured ~15 x 18] You want to make sure that your fabric and batting will wrap around to the underside of the canvas.
2. I really wanted to use a staple gun for this part, but my husband refused to reveal its location because he thinks that I am not careful with sharp objects. He is probably right and therefore I used thumb tacks. I believe that the stapling would be more sturdier and quicker, but thumb tacks give you more room to mess up and try again.
3. Staple or Tack both the fabric and the batting to the underside of the canvas. Be sure to pull it taught and that the design of the fabric is not cock-eyed. Corners can be tricky. Here is how I did mine:
4. You want to lay out the ribbon so that it creates a diamond pattern on the front. I laid stripes of ribbon about 5.5 inches apart. You can space it further apart to accommodate larger photos. Staple or tack the ribbons snuggly on the back of the canvas. You want theses ribbons to be very taught so that the photos do not slip down to the bottom of the board.
 |
| This is actually the back of the bow-holder, but you can see how I used tacks for the ribbon. |
5. I had this marvelous idea that I would use these jeweled brads where the ribbons criss-cross. It was brilliant except of the part where they wouldn't poke through the two layers of ribbon, the fabric, and the batting. In the end, I just hot-glued them to where the ribbons intersected.
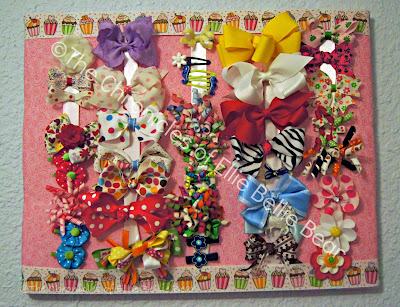
DIY Bow Holder:
The same supplies as above, minus the brackets.
Follow steps 1-3.
Choose a slightly wider type of ribbon. Again, I only used one spool of satin ribbon. Instead of criss-crossing into a diamond-shape, lay the ribbon vertically. I spaced mine 2.5 inches apart to accommodate the larger bows.
Tack or staple the ribbon onto the back of the canvas [see above]. Make sure it is taught so that the hairbows do not slide down to the bottom.
You are done!


LOVE IT!! Totally stealing this idea too!!
ReplyDeleteWow. That looks really easy to do. I think I can try doing that. Thanks for sharing this.
ReplyDeleteCheap Canvas Prints
I LOVE this!!! What a great idea! I have two young daughter with LOTS of hair accessories ... I'll definitely be making a couple of these!
ReplyDeleteMarlene
Info site for San Antonio Movers website